GAIn Python interface
The command-line workflow is designed for specific GAIn tasks, such as annotating variants, positions, or regions and inspecting resources in a GRR. This covers many common annotation use cases. However, users may also want to ask more open-ended questions, such as summarizing the contents of a repository, querying a resource over a custom interval, combining information from several resources, or generating a custom plot. The Python interface supports these workflows by allowing users to access GRR resources directly and process the results using standard Python tools.
The first step is to connect to a Genomic Resource Repository (GRR). In the simplest case, a repository can be accessed without providing any arguments:
from gain.genomic_resources.repository_factory import build_genomic_resource_repository
grr = build_genomic_resource_repository()
Calling build_genomic_resource_repository() without arguments uses the default GRR configuration available
in the user environment. In a standard GAIn installation, the default configuration provides access to
the public IossifovLab GRR. Users can also access local repositories or other public repositories by
providing the repository definition explicitly. For example, the code below accesses the current
working directory as a local GRR:
import os
from gain.genomic_resources.repository_factory import build_genomic_resource_repository
grr = build_genomic_resource_repository({
    "id": "local_grr",
    "type": "directory",
    "directory": os.getcwd(),
})
After connecting to a repository, individual resources can be accessed using their resource IDs. For example, users can access a reference genome, a gene models resource, or a position score resource, and then call resource-specific methods on the resulting Python objects. This allows GRR resources to be queried directly in Python for custom analyses that are not part of a predefined annotation workflow.
The examples below illustrate three uses of the Python interface: inspecting chromosome lengths from a reference genome, locating a gene and retrieving scores across its interval, and summarizing the number of resources available for different genome builds. Working with resources in Python provides more detail on the Python methods available for different resource types.
1: Chromosome lengths
The following example shows how to access a reference genome and retrieve chromosome lengths for a selected set of canonical chromosomes (chromosomes 1-22, X, Y, and M). First, the default GRR is accessed and a reference genome resource is retrieved using its resource ID. The script then defines a set of canonical chromosome names and iterates over the chromosomes available in the genome. For each chromosome that matches the canonical set, the chromosome length is retrieved and printed.
from gain.genomic_resources.repository_factory import build_genomic_resource_repository
grr = build_genomic_resource_repository()

from gain.genomic_resources.reference_genome import build_reference_genome_from_resource_id
genome = build_reference_genome_from_resource_id("hg38/genomes/GRCh38-hg38", grr).open()

# Define canonical chromosomes
canonical_chroms = {f"chr{i}" for i in range(1, 23)}
canonical_chroms.update(["chrX", "chrY", "chrM"])

for chrom in genome.chromosomes:
    if chrom in canonical_chroms:
        print(chrom, genome.get_chrom_length(chrom))
Save this file as python_1.py, and run it with:
python python_1.py
The output lists the canonical chromosome names and their lengths for the hg38/genomes/GRCh38-hg38 genome
resource. The same chromosome lengths are reported in the
HTML summary page for this resource,
allowing users to compare the Python output with the GAIn resource summary.
chr1 248956422
chr2 242193529
chr3 198295559
chr4 190214555
chr5 181538259
chr6 170805979
chr7 159345973
chr8 145138636
chr9 138394717
chr10 133797422
chr11 135086622
chr12 133275309
chr13 114364328
chr14 107043718
chr15 101991189
chr16 90338345
chr17 83257441
chr18 80373285
chr19 58617616
chr20 64444167
chr21 46709983
chr22 50818468
chrX 156040895
chrY 57227415
chrM 16569
2: Position scores across a gene
This example shows how to retrieve and visualize position scores across a gene (e.g. TP53).
The script uses the MANE 1.5 gene models resource (hg38/gene_models/MANE/1.5) to obtain
the genomic coordinates of the primary transcript. It then queries the phastCons100way position
score resource (hg38/scores/phastCons100way) across that interval to retrieve conservation scores.
The scores are plotted over the TP53 region, with genomic position on the x-axis and the position
score on the y-axis, and the resulting figure is saved as TP53_phastCons100way.png in the current
working directory. This example illustrates how gene models and position score resources can be
combined to extract and visualize signal over a biologically meaningful region.
GENE_NAME = "TP53"

from gain.genomic_resources.repository_factory import build_genomic_resource_repository
grr = build_genomic_resource_repository()

from gain.genomic_resources.gene_models import build_gene_models_from_resource_id
gene_models = build_gene_models_from_resource_id("hg38/gene_models/MANE/1.5", grr).load()
tx = gene_models.gene_models_by_gene_name(GENE_NAME)[0]
chrom, start, end = tx.chrom, tx.tx[0], tx.tx[1]
print(f"{GENE_NAME} is on {chrom}, from position {start} to {end}.")

from gain.genomic_resources.genomic_scores import build_score_from_resource_id
score = build_score_from_resource_id("hg38/scores/phastCons100way", grr).open()

xs = []
ys = []
for pos_begin, pos_end, values in score.fetch_region_segments_scores(chrom, start, end):
    for p in range(max(pos_begin, start), min(pos_end, end) + 1):
        xs.append(p)
        ys.append(values[0])

import matplotlib.pyplot as plt
plt.figure(figsize=(10, 4))
plt.plot(xs, ys)
plt.xlabel(f"Position on {chrom}")
plt.ylabel("phastCons100way")
plt.title(f"phastCons100way across {GENE_NAME}")
plt.tight_layout()
plt.savefig(f"{GENE_NAME}_phastCons100way.png", dpi=150)
fetch_region_segments_scores yields one (pos_begin, pos_end, values) tuple per
record of the resource that touches the queried region, at that record’s own
extent – a record straddling either end of the gene comes back whole, which is
why the inner loop clips each segment to [start, end] before plotting.
Save this file as python_2.py, and run it as before:
python python_2.py
This will produce the following image:
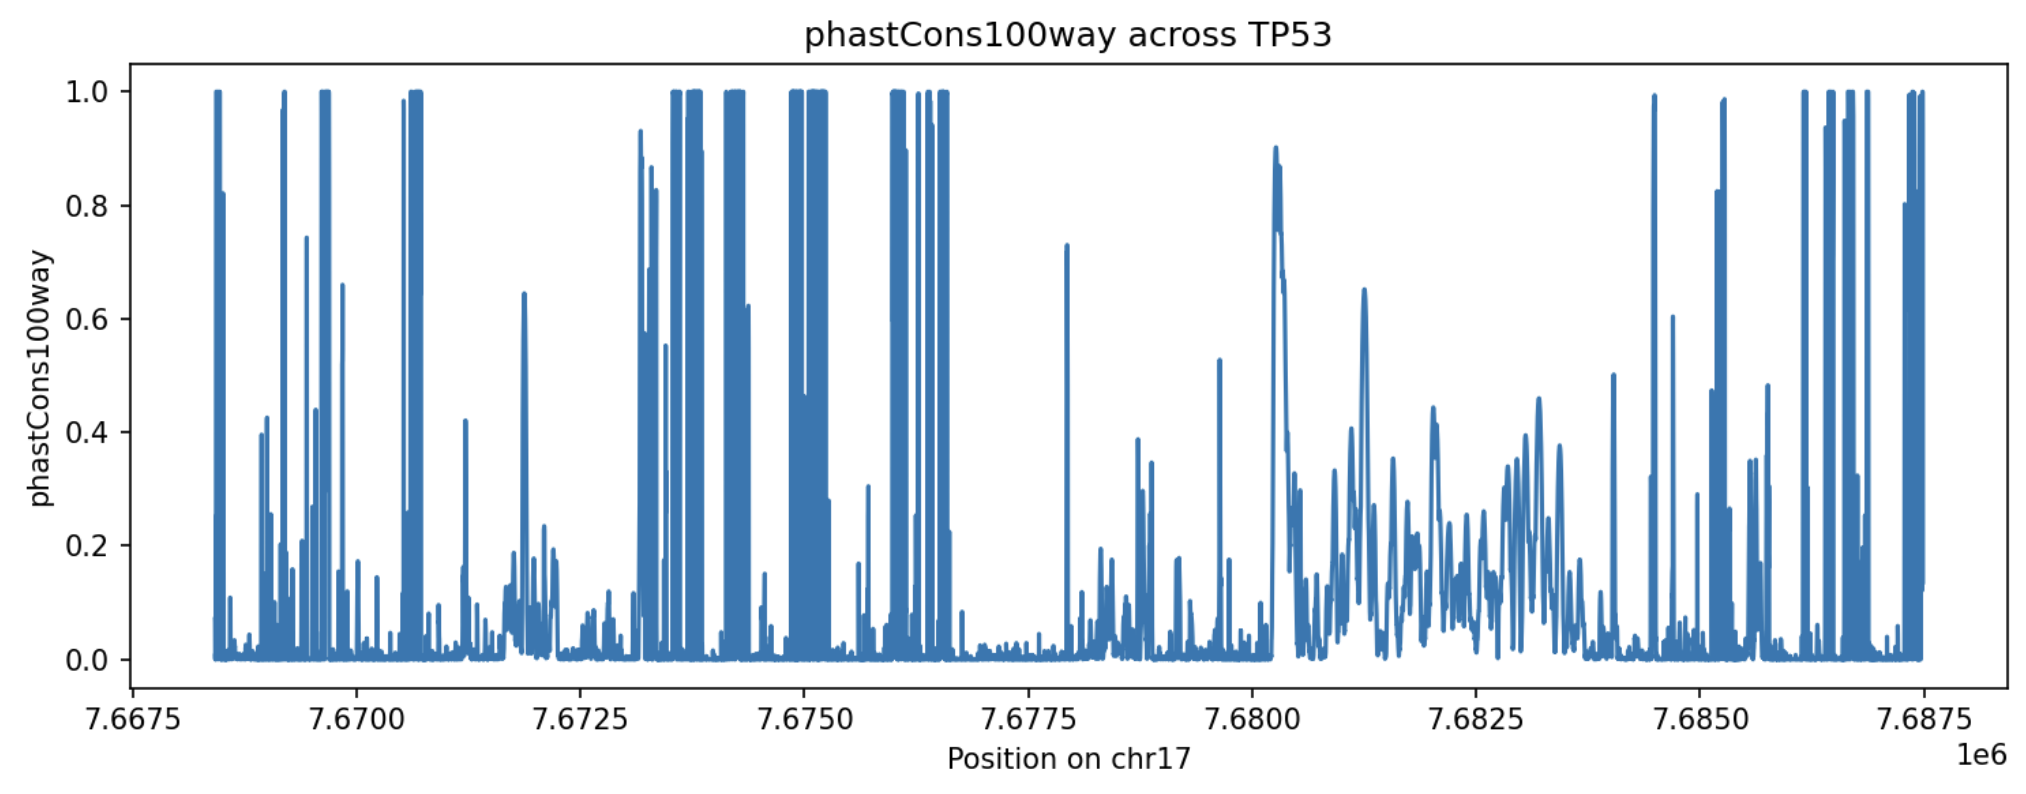
In this plot, higher phastCons100way values indicate positions that are more conserved
across the 100-way vertebrate alignment used by the resource. Peaks in the plot mark parts of
the TP53 interval that are under stronger evolutionary constraint, while lower values indicate
less conserved positions. This provides a compact view of how conservation varies across the TP53 locus.
3: Resource counts by genome
This example summarizes how many resources of selected types are available for each genome build
in the GRR. The script iterates over all resources, assigns each resource to a genome based on
the prefix of its resource ID (e.g., hg19/, hg38/, hs1/), filters by resource type, and counts
how many resources of each type are present for each genome. The result is organized as a table (DataFrame).
import pandas as pd
from collections import defaultdict
from gain.genomic_resources.repository_factory import build_genomic_resource_repository

grr = build_genomic_resource_repository()

genomes = ["hg19", "hg38", "hs1"]
types = ["genome", "gene_models", "position_score", "allele_score", "fragment_score"]

# initialize counts
counts = {g: defaultdict(int) for g in genomes}

for resource in grr.get_all_resources():
    rid = resource.get_id()
    rtype = resource.get_type()

    for g in genomes:
        if rid.startswith(f"{g}/") and rtype in types:
            counts[g][rtype] += 1

# build dataframe
df = pd.DataFrame(
    {g: [counts[g][t] for t in types] for g in genomes},
    index=types
)

df.index.name = "resource_type"
print(df)
Save this file as python_3.py, and run it as before:
python python_3.py
The output is a table with resource types as rows and genome builds as columns, where each entry gives the number of resources of that type for the corresponding genome.
resource_type |
hg19 |
hg38 |
hs1 |
|---|---|---|---|
genome |
2 |
4 |
1 |
gene_models |
5 |
51 |
1 |
position_score |
135 |
8 |
0 |
allele_score |
4 |
26 |
0 |
fragment_score |
0 |
6 |
0 |
Note
These counts describe the default GRR as of 31 July 2026. They track the contents of the repository, so the numbers you get will differ as resources are added and removed.
4: Annotating variants in Python
The previous examples accessed GRR resources directly. The Python interface can also be used to construct and run GAIn annotation pipelines without calling the command-line annotate_tabular or annotate_vcf tools. This is useful when variants are already available inside a Python script, notebook, or larger analysis workflow, and when users want to annotate them programmatically.
In this example, a small annotation pipeline is defined directly as a YAML string. The pipeline contains a single effect_annotator, which uses the MANE 1.5 gene models resource to predict the effect of a variant. The variant is represented as a VCFAllele object, and the pipeline is then used to annotate that allele.
from gain.annotation.annotation_factory import load_pipeline_from_yaml
from gain.annotation.annotatable import VCFAllele


pipeline = load_pipeline_from_yaml("""
- effect_annotator:
    gene_models: hg38/gene_models/MANE/1.5
""", None)

allele = VCFAllele("chr1", 11796321, "G", "A")

result = pipeline.annotate(allele)
batchresult = pipeline.batch_annotate([allele, allele])

print(result)
print(batch_result)
Save this file as python_4.py, and run it as before:
python python_4.py
This prints two outputs. The first output, result, is the annotation result for one allele. It is produced by calling pipeline.annotate(), which runs the pipeline on a single annotatable object.
{'worst_effect': 'missense', 'worst_effect_genes': 'MTHFR', 'gene_effects': 'MTHFR:missense', 'effect_details': 'ENST00000376590.9:MTHFR:missense:222/656(Ala->Val)', 'gene_list': ['MTHFR']}
The second output, batch_result, is produced by calling pipeline.batch_annotate(). This method takes a list of annotatable objects and returns annotation results for all of them. In this example, the same allele is provided twice, so the batch output contains two equivalent annotation results.
[{'worst_effect': 'missense', 'worst_effect_genes': 'MTHFR', 'gene_effects': 'MTHFR:missense', 'effect_details': 'ENST00000376590.9:MTHFR:missense:222/656(Ala->Val)', 'gene_list': ['MTHFR']}, {'worst_effect': 'missense', 'worst_effect_genes': 'MTHFR', 'gene_effects': 'MTHFR:missense', 'effect_details': 'ENST00000376590.9:MTHFR:missense:222/656(Ala->Val)', 'gene_list': ['MTHFR']}]
The output shows that the allele is annotated as a missense variant in MTHFR according to the MANE 1.5 gene models resource. In larger analyses, the same pattern can be extended by adding more annotators to the YAML pipeline, such as position scores, allele scores, or additional gene model resources. The annotate method is convenient for annotating one variant at a time, while batch_annotate is useful when many variants are processed inside the same Python workflow.
5: Creating an annotator plugin
The previous examples used existing GAIn annotators and GRR resources. In some cases, however, users may want to add their own annotation logic to a pipeline. For example, a project may need a custom decision rule that combines several existing annotation attributes into a new output attribute. GAIn supports this through annotator plugins, which allow users to define new annotators that can be used in the same way as built-in annotators.
In this example, we create a simple plugin annotator called experimental_followup. The annotator is intended to run as the final step of an annotation pipeline. It does not query GRR resources directly. Instead, earlier annotators produce attributes such as population frequency, conservation score, and ClinVar clinical significance. The plugin then reads these attributes from the annotation context and combines them into a single yes/no decision. In this toy example, a variant is selected for experimental follow-up if it is rare in gnomAD, conserved according to phyloP7way, and classified as pathogenic in ClinVar.
The decision rule used here is intentionally simple. A variant is selected for experimental follow-up only if all three conditions are satisfied: the gnomAD exome allele frequency is less than 1%, the phyloP7way score is greater than 0, and the ClinVar clinical_significance attribute is equal to Pathogenic. These thresholds are used only to demonstrate how a plugin annotator can combine existing annotation attributes; they should not be interpreted as general clinical or experimental guidelines.
The pipeline below first creates the attributes needed by the plugin annotator before running the custom annotator. The position_score_annotator adds the phyloP7way conservation score. The normalize_allele_annotator creates a normalized allele representation, which is then used by the gnomAD and ClinVar allele score annotators. Finally, the custom experimental_followup annotator reads the attributes produced by the previous steps and adds the new experimental_followup output attribute. Copy the following pipeline configuration and save it as plugin_pipeline.yaml:
- position_score_annotator:
    resource_id: hg38/scores/phyloP7way

- normalize_allele_annotator:
    genome: hg38/genomes/GRCh38-hg38

- allele_score_annotator:
    resource_id: hg38/variant_frequencies/gnomAD_4.1.0/exomes/ALL
    input_annotatable: normalized_allele

- allele_score_annotator:
    resource_id: hg38/scores/ClinVar_20251019
    input_annotatable: normalized_allele
    attributes:
    - name: clinical_significance
      source: CLNSIG

- experimental_followup: {}
The order of the annotators is important because the custom experimental_followup annotator depends on attributes produced earlier in the pipeline. For this reason, it is placed at the end of the pipeline. In this example, the plugin expects the annotation context to contain phyloP7way, gnomad_v4_exome_ALL_af, and clinical_significance.
The plugin itself is implemented as a small Python package. In this example, the package has the following structure:
experimental_followup_plugin/
├── pyproject.toml
└── experimental_followup_annotator/
    ├── __init__.py
    ├── annotator.py
    └── adapter.py
The annotator.py file contains the decision rule used by the plugin. The adapter.py file connects this rule to the GAIn annotation framework by declaring the output attribute and passing the annotation context to the rule. The __init__.py file can be empty. It marks experimental_followup_annotator as a Python package. Finally, pyproject.toml registers the plugin so that GAIn can discover the new experimental_followup annotator.
The core decision logic is implemented in annotator.py. The function receives the current variant as an annotatable object and the current annotation context as a dictionary. The context contains attributes produced by earlier annotators in the pipeline. This example does not use the annotatable object directly, but it is included in the function signature so that the rule could also use properties of the variant itself if needed.
The rule reads three attributes from the context: gnomad_v4_exome_ALL_af, phyloP7way, and clinical_significance. The variant is selected for experimental follow-up only if the gnomAD exome allele frequency is below 0.01, the phyloP7way score is greater than 0, and the ClinVar clinical significance is Pathogenic. Copy the following code and save it as experimental_followup_annotator/annotator.py:
from typing import Any


def to_float(value: Any) -> float | None:
    if value in [None, "", "."]:
        return None
    try:
        return float(value)
    except (TypeError, ValueError):
        return None


def annotate_experimental_followup(annotatable, context: dict[str, Any]) -> str:
    exome_af = to_float(context.get("gnomad_v4_exome_ALL_af"))
    phylo = to_float(context.get("phyloP7way"))
    clinvar = str(context.get("clinical_significance", "")).strip()

    rare = exome_af is not None and exome_af < 0.01
    conserved = phylo is not None and phylo > 0
    pathogenic = clinvar == "Pathogenic"

    return "yes" if rare and conserved and pathogenic else "no"
The adapter.py file connects the decision function to the GAIn annotation pipeline. It declares the new output attribute, experimental_followup, and calls annotate_experimental_followup for each variant. The adapter receives the annotation context from GAIn, which allows the plugin to use attributes produced by earlier annotators without querying the original GRR resources directly.
The full adapter.py file contains the standard wrapper code needed to expose this function as a GAIn annotator and can be downloaded here. In brief, it defines an ExperimentalFollowupAnnotator class, declares the experimental_followup attribute using AttributeSpec, and implements the single-variant annotation method, which answers an AnnotatedValues keyed by attribute name; batch annotation comes from the base class, and is only worth overriding when the tool has a genuinely batched path. With this wrapper in place, the plugin can be included in a pipeline like any other GAIn annotator.
Before registering the plugin, make sure that experimental_followup_annotator is a Python package. This can be done by creating an empty __init__.py file:
touch experimental_followup_annotator/__init__.py
Next, create pyproject.toml in the directory, experimental_followup_plugin/. Copy the following contents and save them as pyproject.toml:
[project]
name = "experimental-followup-annotator"
version = "0.1.0"
description = "Example GAIn annotator plugin for experimental follow-up decisions"
requires-python = ">=3.10"

[project.entry-points."gain.annotation.annotators"]
experimental_followup = "experimental_followup_annotator.adapter:build_experimental_followup_annotator"

[tool.setuptools.packages.find]
where = ["."]
include = ["experimental_followup_annotator*"]

[build-system]
requires = ["setuptools"]
build-backend = "setuptools.build_meta"
The most important part of this file is the entry point under gain.annotation.annotators. This entry point tells GAIn that the pipeline name experimental_followup should be handled by the build_experimental_followup_annotator function in adapter.py.
With pyproject.toml in place, install the plugin in editable mode from the plugin directory. The command should be run in the same Python environment where GAIn is installed.
pip install -e .
After installation, the plugin annotator can be used in a regular GAIn annotation pipeline. In this example, the input file is small_input.csv, the pipeline file is plugin_pipeline.yaml, and the annotated output is written to small_input.plugin.csv:
annotate_tabular small_input.csv plugin_pipeline.yaml -f -o small_input.plugin.csv
The output file contains the attributes produced by the standard annotators, together with the new experimental_followup attribute added by the plugin. For each input variant, this attribute is set to yes only when the variant is rare in gnomAD, conserved according to phyloP7way, and pathogenic according to ClinVar. Otherwise, the value is set to no.
chrom |
pos |
ref |
alt |
phyloP7way |
gnomad_v4_exome_ALL_af |
clinical_significance |
experimental_followup |
|---|---|---|---|---|---|---|---|
chr14 |
21415880 |
G |
A |
0.917 |
Pathogenic/Likely_pathogenic |
no |
|
chr17 |
7674904 |
TCT |
T |
-0.12 |
6.84e-07 |
Pathogenic |
no |
chr7 |
117587806 |
G |
A |
0.917 |
0.000404 |
Pathogenic |
yes |
Only the third variant is selected for experimental follow-up. This variant satisfies all three conditions used by the plugin: its gnomAD exome allele frequency is below 0.01, its phyloP7way score is positive, and its ClinVar clinical_significance value is Pathogenic. The first variant is not selected because the gnomAD exome allele frequency is missing and the ClinVar value is Pathogenic/Likely_pathogenic rather than Pathogenic. The second variant is rare and pathogenic, but it is not selected because its phyloP7way score is below 0.
This example shows one possible use of a plugin annotator. In this case, the plugin acts as a final decision step that combines attributes produced by earlier annotators into a project-specific output attribute. Other plugins could implement different kinds of custom annotation logic, including rules that use the variant itself, external programs, local files, or other project-specific information.