GAIn Web interface
The Getting Started on the Web section demonstrated how to annotate variants, positions, or regions on the GAIn web interface using an existing saved pipeline, both for single-annotatable queries and for annotation jobs. This section covers the web interface in more detail, with an emphasis on creating custom annotation pipelines by adding annotators or resources, and on user-account features such as registration, saved pipelines, annotation history, and user quotas.
Create annotation pipelines
In the GAIn web interface (https://gain.iossifovlab.com/), the left side of the page contains the annotation pipeline editor. Saved annotation pipelines are displayed there and can be selected for immediate use. Clicking New at the bottom of the editor opens an empty pipeline definition for creating a custom annotation pipeline. In this initial empty state, the annotators and attributes panels at the bottom of the editor are empty, while the annotatables and gene list panels are not yet available. A custom pipeline can then be built either by adding annotators or by adding resources.

Add annotators
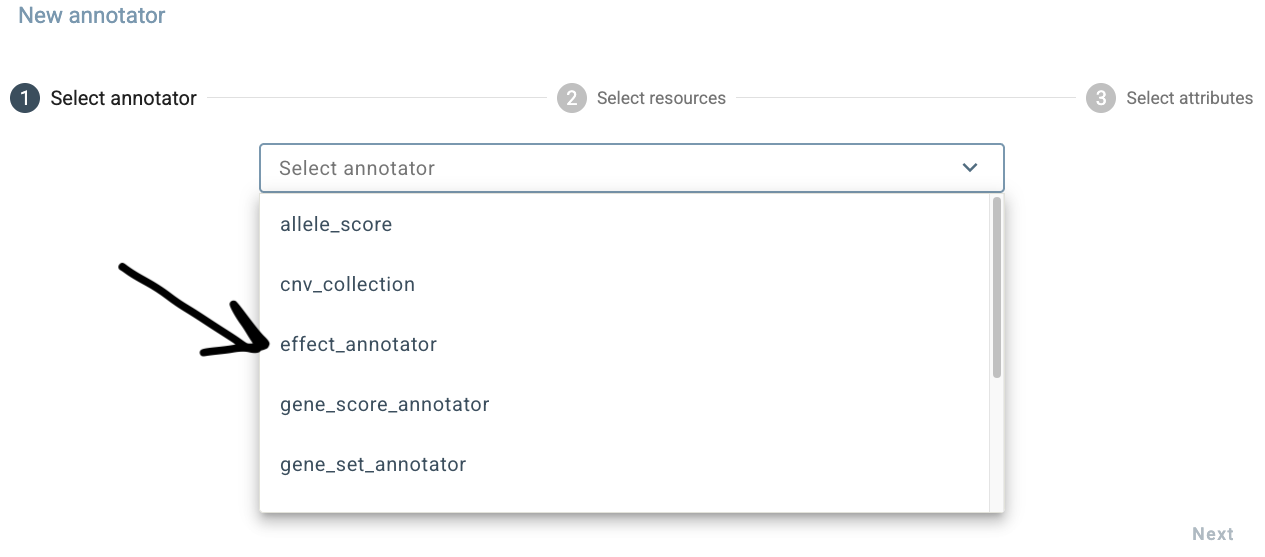
To add a new annotator, click New annotator at the bottom of the annotation pipeline editor. This opens a
three step dialog box in which the first step is to select the type of annotator to add. In this example,
choose effect_annotator.
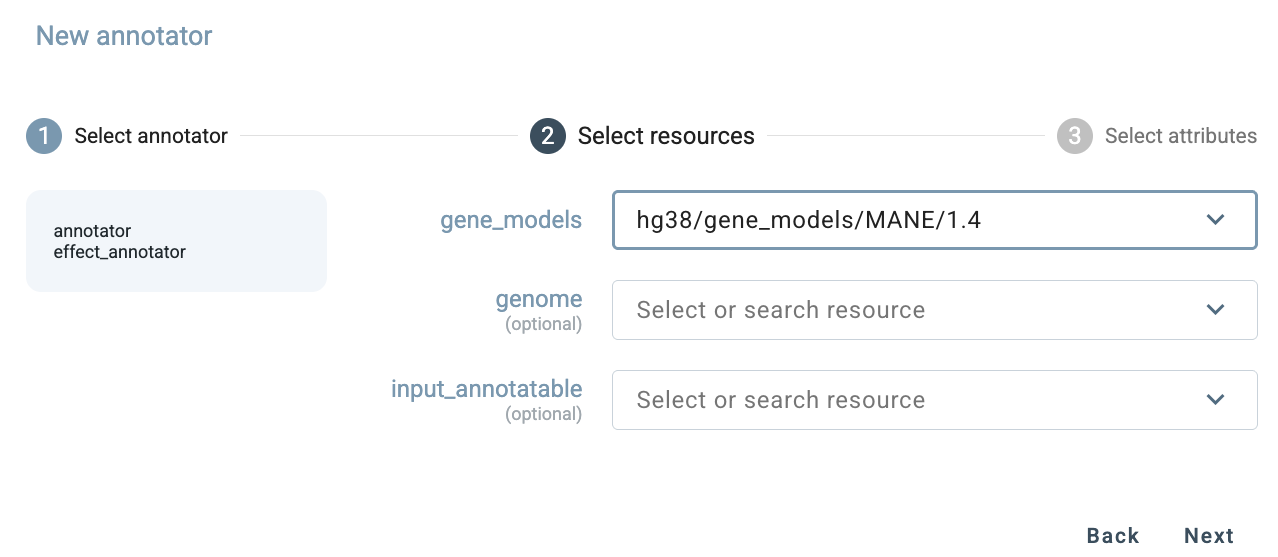
Next, select the resource or resources that the annotator will use. Only resources compatible with the
chosen annotator are shown in this step, and the search box can be used to filter the list. For effect_annotator,
compatible gene model resources are displayed. In this example, choose MANE/1.4.
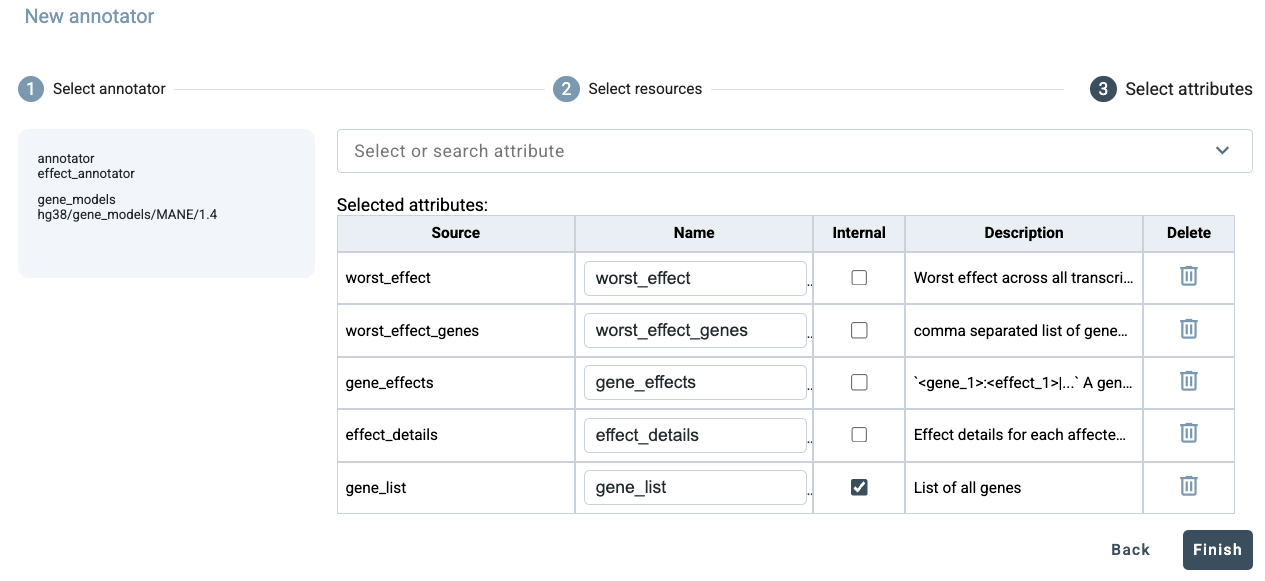
In the final step, select the attributes to be included in the annotation output. A default set of attributes is shown initially. Attributes can be removed using the buttons on the right, and any attribute can be marked as internal using the corresponding checkboxes. Additional attributes available from this annotator can also be found by using the search box at the top of the dialog. After making the desired selections, click Finish.
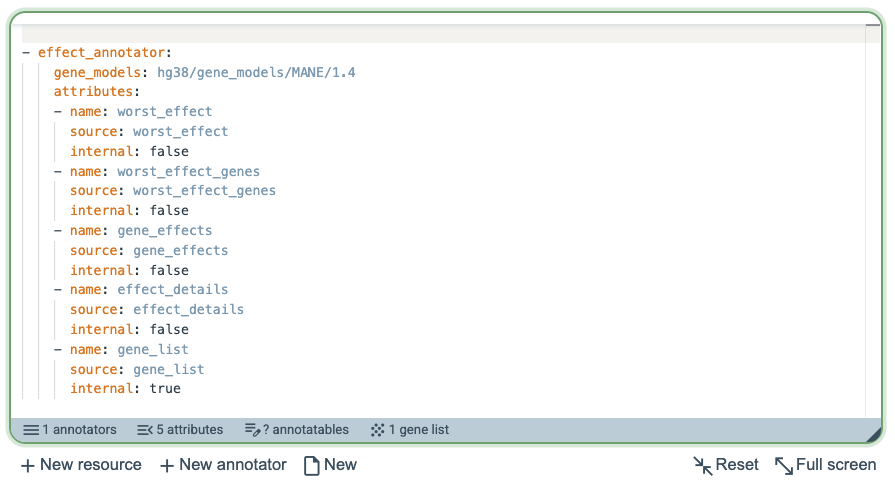
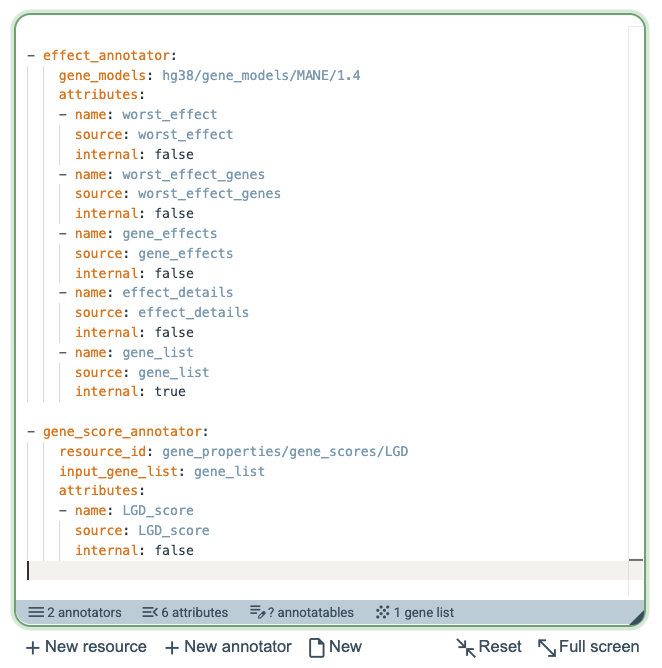
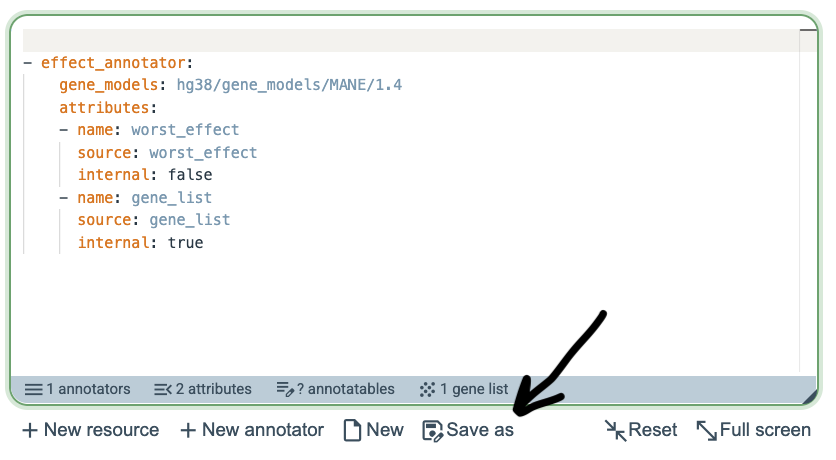
GAIn then generates the corresponding annotation pipeline definition and inserts it into the annotation pipeline editor using the correct syntax. The gray summary bar at the bottom of the editor shows the components currently present in the pipeline. In this example, the pipeline contains 1 annotator that produces 5 attributes. No annotatable has yet been defined, while 1 gene list is available for downstream use, representing the genes affected by the variant.
Next, add another annotator by clicking New annotator, which again opens the same three-step dialog.
This time, select gene_score_annotator as the annotator type. Unlike annotators that operate directly on the input annotatable, a gene
score annotator operates on genes rather than directly on the input annotatable. It therefore requires a gene
list as input. In this example, that gene list is already available from the previously added effect_annotator,
which identified the genes affected by the annotatable. This illustrates how one annotator can produce information
that is then used by a downstream annotator.

In the Select resources step, choose LGD scores as the resource. Then specify that the gene_list produced
by the previously added effect_annotator should be used as the input gene list for this annotator.
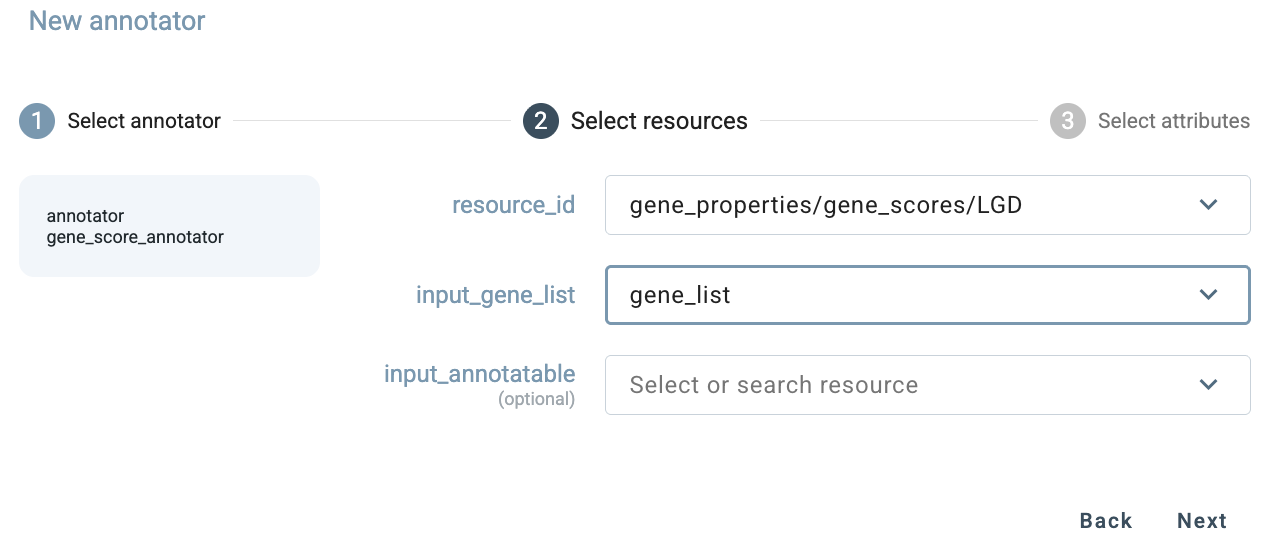
In the final step, select the attributes to be generated by the annotator. In this example, remove LGD rank, keep only LGD score and click Finish.
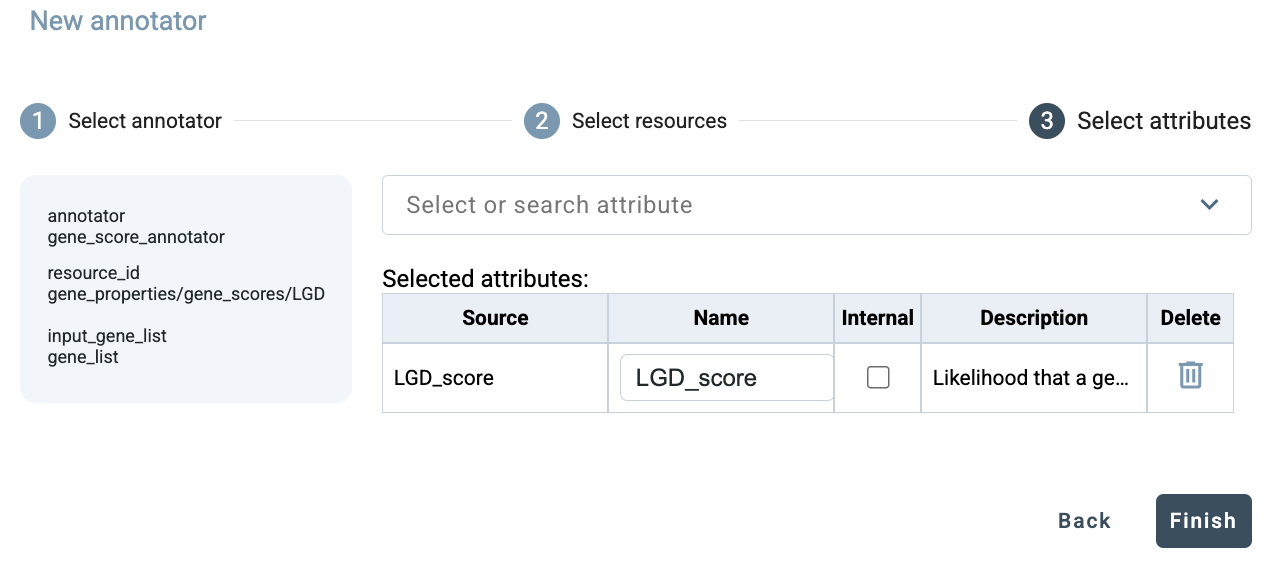
GAIn then adds the gene_score_annotator to the annotation pipeline editor using the correct syntax, including the specification that the gene_list produced by the effect_annotator should be used as input for this annotator. The summary bar at the bottom of the editor is updated accordingly and now shows that the pipeline contains 2 annotators and 6 attributes.
Add resources
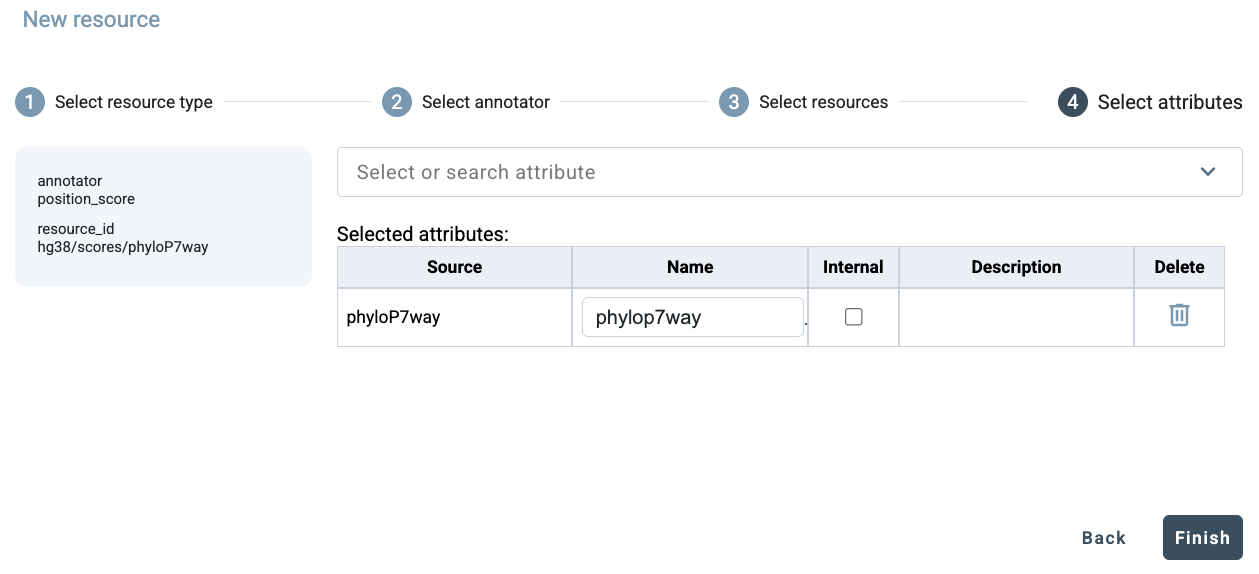
Instead of extending a pipeline by adding an annotator, users can also extend it by adding a resource. In this case, GAIn guides the user from the resource side and then shows the annotators that are compatible with the selected resource. To add a resource, click New resource at the bottom of the annotation pipeline editor. This opens a four-step dialog. In the first step, select the type of resource to add. In this example, choose position score and then among the available position scores, choose PhyloP7.

Since position score resources are used only by position_score_annotator,
GAIn skips the annotator-selection step in this case and proceeds directly to resource selection.
Here, PhyloP7way is already selected, so click Next to continue to attribute selection. PhyloP7way provides
only a single attribute, so click Finish to add this resource to the pipeline.
The pipeline (only the bottom section is shown here) now has 3 annotators and produces 7 attributes.

Registration and user accounts
The examples above show how a new annotation pipeline can be created directly in the GAIn web interface and used immediately for annotation. However, if the user leaves the page without saving, the newly created pipeline is lost. Registering for a GAIn account makes it possible to preserve this work and provides several additional conveniences.
One important benefit of registration is the ability to save pipelines by clicking Save as. This allows users to keep custom pipelines for later use, compare alternative versions of a pipeline, and iteratively refine pipeline definitions without having to recreate them from scratch. Saved pipelines are especially useful when testing different combinations of annotators, resources, and attributes.
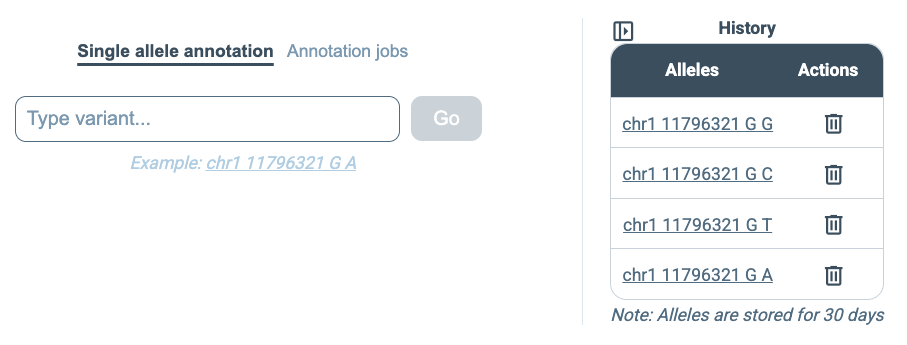
Registration also allows annotation results to be retained in the user account. This applies both to single annotatable annotation and to annotation jobs. Once an annotation has been run, it appears in the user’s history on the right side of the interface, making it possible to revisit earlier analyses, inspect their details, download previous results again, or rerun similar annotations without repeating the full setup.
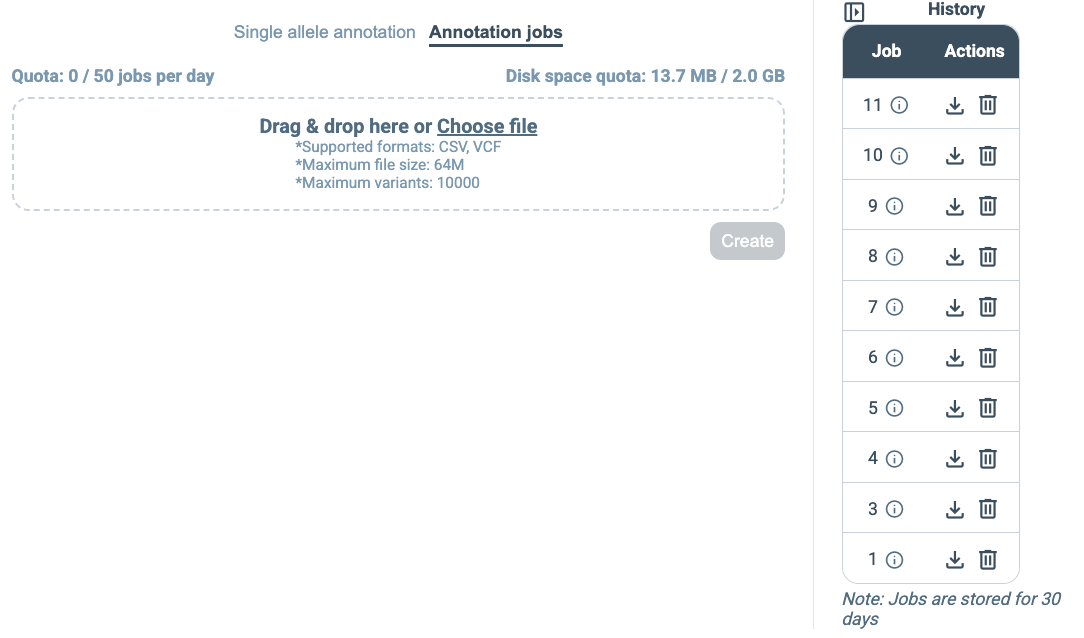
In addition, registered accounts are associated with usage quotas for annotation jobs. At present, the maximum accepted input file size is 64 MB, and the maximum number of annotatables per job is 10,000. Each user may submit up to 50 annotation jobs per day and may use up to 2 GB of storage space for saved data. These limits make it possible to support routine use of the web service while maintaining fair access across users.